이 문서는 CodeDeploy 를 통해 배포 시스템을 구성 하면서 경험한 내용을 바탕으로 정리한 문서이다. 간략한 내용만 다루고 있으므로, 좀 더 상세한 내용을 들춰보고 싶다면 이후에 작성한 “나는 코드를 쓸테니, 너는 인프라를 맡거라.” 문서를 읽어보길 바란다.
아래는 구성 전 논의 된 지향점들 이고, 이에따라 그 때 당시 CodeDeploy 가 가장 적합해서 선택하게 되었다.
- 쉽고, 용이
- 무중단
- 자동화
- 롤백
- 안정성
- AWS 리소스 최대한 활용
Git 서버로 Bitbucket 을 채택하여 사용하고있는데, Bitbucket 에는 파이프라인이라는 개념이 존재한다. 이를 테면 마스터 브랜치에 푸시한다고 가정하면 이에 따른 프로세스들을 기술할 수 있다. 따라서 마스터 브랜치에 푸시하면, 배포로 간주하고 배포에 따른 스크립트가 실행된다.
기본적으로 S3 의 패키지들이 업로드되고, 이후에 CodeDeploy 클라이언트를 통해 배포가 진행된다. 아래는 간단하게 작성한 위 프로세스에 대한 파이썬 스크립트 이다.
from __future__ import print_function
import os
import sys
from time import strftime, sleep
import boto3
from botocore.exceptions import ClientError

VERSION_LABEL = strftime("%Y%m%d%H%M%S")
BUCKET_KEY = os.getenv('APPLICATION_NAME') + '/' + VERSION_LABEL + \
    '-bitbucket_builds.zip'

def upload_to_s3(artifact):
    """
    Uploads an artifact to Amazon S3
    """
    try:
        client = boto3.client('s3')
    except ClientError as err:
        print("Failed to create boto3 client.\n" + str(err))
        return False
    try:
        client.put_object(
            Body=open(artifact, 'rb'),
            Bucket=os.getenv('S3_BUCKET'),
            Key=BUCKET_KEY
        )
    except ClientError as err:
        print("Failed to upload artifact to S3.\n" + str(err))
        return False
    except IOError as err:
        print("Failed to access artifact.zip in this directory.\n" + str(err))
        return False
    return True

def deploy_new_revision():
    """
    Deploy a new application revision to AWS CodeDeploy Deployment Group
    """
    try:
        client = boto3.client('codedeploy')
    except ClientError as err:
        print("Failed to create boto3 client.\n" + str(err))
        return False

    try:
        response = client.create_deployment(
            applicationName=str(os.getenv('APPLICATION_NAME')),
            deploymentGroupName=str(os.getenv('DEPLOYMENT_GROUP_NAME')),
            revision={
                'revisionType': 'S3',
                's3Location': {
                    'bucket': os.getenv('S3_BUCKET'),
                    'key': BUCKET_KEY,
                    'bundleType': 'zip'
                }
            },
            deploymentConfigName=str(os.getenv('DEPLOYMENT_CONFIG')),
            description='New deployment from BitBucket',
            ignoreApplicationStopFailures=True
        )
    except ClientError as err:
        print("Failed to deploy application revision.\n" + str(err))
        return False

    """
    Wait for deployment to complete
    """
    while 1:
        try:
            deploymentResponse = client.get_deployment(
                deploymentId=str(response['deploymentId'])
            )
            deploymentStatus=deploymentResponse['deploymentInfo']['status']
            if deploymentStatus == 'Succeeded':
                print ("Deployment Succeeded")
                return True
            elif (deploymentStatus == 'Failed') or (deploymentStatus == 'Stopped') :
                print ("Deployment Failed")
                return False
            elif (deploymentStatus == 'InProgress') or (deploymentStatus == 'Queued') or (deploymentStatus == 'Created'):
                continue
        except ClientError as err:
            print("Failed to deploy application revision.\n" + str(err))
            return False
    return True

def main():
    if not upload_to_s3('/tmp/artifact.zip'):
        sys.exit(1)
    if not deploy_new_revision():
        sys.exit(1)

if __name__ == "__main__":
    main()
아래는 CodeDeploy 의 배포 진행 절차이다.
- Provisioning replacement instances
- Installing application on replacement instances
- Rerouting traffic to replacement instances
- Terminating original instances
마지막 절차 “Terminating original instances” 에서 기본적으로 Waiting Time 을 임의적으로 설정을 하게되는데, 이는 처음에 지향하는 안정성과 상이되어 ASG 라이프 사이클 훅을 통하여 기존의 전달 받은 요청건에 대하여 모든 프로세스가 완료되면 즉시 terminate 하는 방향으로 진행했다.
배포 유형이, In-place 와 Blue-green 형태 두가지로 나뉜다.
무중단 배포를 위해 우리의 경우 Blue/Green 형태를 채택했다. 이외 배포 구성 또한 지원하는데, 우리는 “One At A Time” 을 채택했다. (이 구성은 한 번에 한 인스턴스에 대하여 어플리케이션 개정을 배포한다.) 아래 표를 참고하면 좀 더 이해가 편할 것 이다.
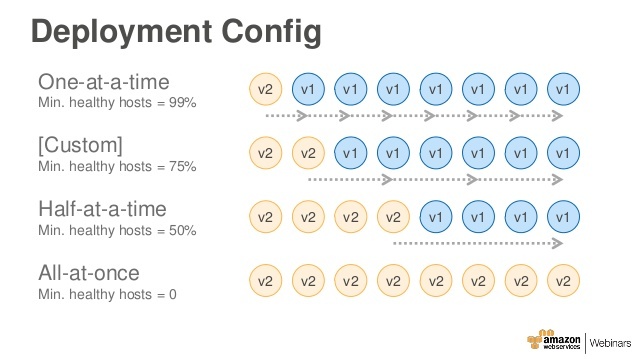
이와 같은 흐름으로, 인스턴스 두개에 대상의 배포를 진행한다고 했을 때, 약 25분 정도 소요된다. 이벤트 트리를 확인 해보니, “Block Traffic” 단계에서 약 5분 정도 소요된다.
이 부분에 대하여 찾아보니 AWS 포럼 글을 보게 되었고, ELB 와 연관되 있는 것을 확인하고 ELB Health Check기본 값을 살펴보면 아래와 같다.
- Timeout 5 seconds
- Interval 30 seconds
- Unhealthy threshold 2
- Healthy threshold 10
위와 같은 시간 소요(Interval(30) +Timeout(5))* healthy(10) 를 줄이기 위해 아래와 같이 설정 변경했다.
- Timeout 2 seconds
- Interval 5 seconds
- Unhealthy threshold 2
- Healthy threshold 2
설정 변경 후, 20초내로 소요된다.
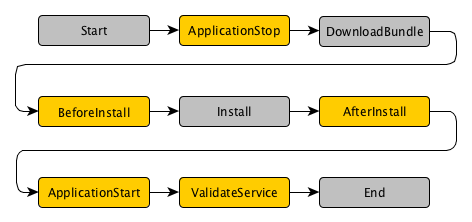
그리고 CodeDeploy 는 흐름에 따른 “이벤트 훅”을 지원한다.
아래 표에 기재된 흐름에 따라 그에 대응하는 훅에 내용을 서술하면된다.
이에 따라 소요되는 시간은 정의한 스크립트에 따라 각기 다르다.
이로써 무중단 배포 시스템을 간단하게 구현했다.

영준 (=hax0r)
https://www.hax0r.info
I am a passionate back-end developer always in hunger of learning new things and sharing what i have learned. who loves challenges, newest technologies and programming at all.